Classification
![]()
![]()
![]()
![]()
![]()
![]() Studies tab
Studies tab ![]() Structural analysis
Structural analysis ![]()
![]() Particle analysis
Particle analysis
![]() Particle analysis > Classification
Particle analysis > Classification
|
Classification |
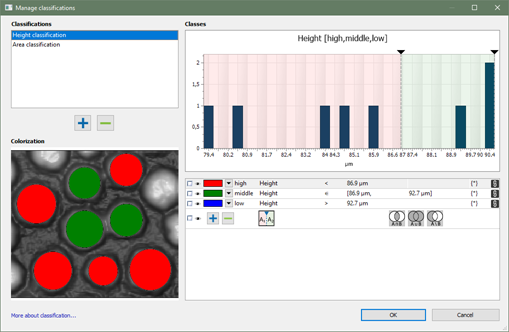
Open a dialog to create or modify classes to manage the classification of particles. |
Vocabulary
▪A classification contains several classes.
▪A class is defined by one or several criteria; the criteria define if a particle is or is not part of this class.
(example: grains smaller than 5 mm are part of class A)
▪A particle is an element that can be classified.
List of classifications
▪By default, a classification having 3 classes is created, for the first parameter.
▪You can have several classifications. Use the ![]() buttons.
buttons.
▪Double-click on a classification in the list to rename it.
Classes
General information about classes
▪To work with a class, select it using the checkbox ![]() .
.
Example: To split classes, or to do an operation with several classes.
▪A class can be visible or hidden. Use the ![]() button.
button.
▪A class has a color. Click on the small arrow ![]() to change the color.
to change the color.
▪A class has a name. The default names (letters A, B, C...) can be changed.
Creating a class
![]()
Creating a new class
Use the ![]() button (at the end of the list of existing classes), to create a new default class.
button (at the end of the list of existing classes), to create a new default class.
Note: The new class will be independent.
Splitting an existing class
Note: A class must already be selected.
Use the Split class button ![]() to split the selected class into two linked classes of identical size.
to split the selected class into two linked classes of identical size.
You can use the Split class button several times.
Notes:
▪The created classes are linked ![]() and share a common limit.
and share a common limit.
▪When splitting a class, already existing linked classes are resized, so that each class has by default the same size on the histogram.
▪If you change the limits of one class, the linked classes will be changed as well.

List of conditions
<= |
Smaller than or equal to |
>= |
Greater than or equal to |
∈[a,b] |
Element of |
< |
Smaller |
> |
Bigger |
= |
Equal to |
!= |
Different from |
∉ [a,b] |
Not element of |
Types of classes
Numerical class
▪Name of the class
▪Name of the used parameter
▪Condition
▪One or two thresholds

Class of type "choice"
▪Name of the class
▪Name of the parameter
▪Condition

Class of type "operation"
You can use existing classes and a mathematical operation, in order to create a new class:
![]()
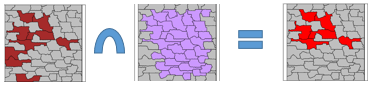
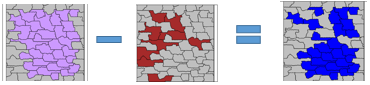
Using a mathematical operation (union, intersection, difference)
![]()
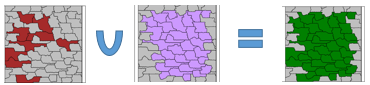
Possible operations with class A (big particles) and class B (interior motifs):
|
A ∪B |
Union |
Note: Two or more classes must already be selected. Create a class with particles that belong to class A or class B. Example: The green class contains the union of both classes: Big and interior particles.
|
|
A ∩ B |
Intersection |
Note: Two or more classes must already be selected. Create a class with particles that belong to class A and class B. Example: The red class contains only common particles: Big interior particles.
|
|
A \ B |
Difference |
Note: Two or more classes must already be selected. Create a class with particles that belong to class A and not to class B. Example: The blue class contains the violet particles minus the dark red particles: Interior particles, except the big ones.
|

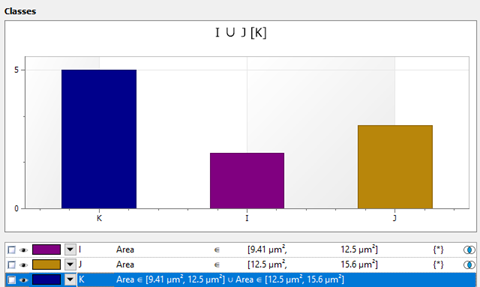
![]() Tip: If you select a class (that is a result of an operation), you can see the classes that have been used for the operation. They are marked with the respective mathematical symbol, at the end of the line.
Tip: If you select a class (that is a result of an operation), you can see the classes that have been used for the operation. They are marked with the respective mathematical symbol, at the end of the line.

"Colored particles" frame
This frame shows the classified and colored particles. If a particle is part of 2 different classes, the color of the most recent class is used.
The frame shows only visible classes ![]() .
.
![]() Tip: Use the mouse to zoom or move the image.
Tip: Use the mouse to zoom or move the image.
Modifying classes using the histogram
▪Use the cursor bars to change the limits of the existing linked classes.
Note: To add another linked class, use the Split class button ![]() .
. ![]() More information above...
More information above...
▪Scroll with the mouse wheel to modify the number of height bars used for the display of heights.
Note: For a class of type "Operation", the histogram shows the number of particles contained in this class, and the number of particles in the classes used for the operation.
Advanced techniques - Using a subset of particles
Note: You must have at least 2 classes, that are not linked (for example a class "Height" and a class "Type of feature", or 2 classes "Area" without a link symbol).
You can use a subset of particles, i.e. particles of an already existing class, instead of all particles {*}, inside another class:
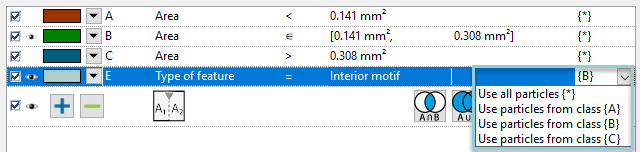
Possibilities with this method:
▪You can use a subset to remove motifs on the edges.
In the example above, you could use the results of class {E} instead of {*}, for classes A, B or C.
Note: There is also an option to remove particles on the edges, in the Refine dialog. More information...
▪![]() You can use a subset to remove the background that is considered as a huge particle.
You can use a subset to remove the background that is considered as a huge particle. ![]() See "Solution 2" in the Tip just below...
See "Solution 2" in the Tip just below...
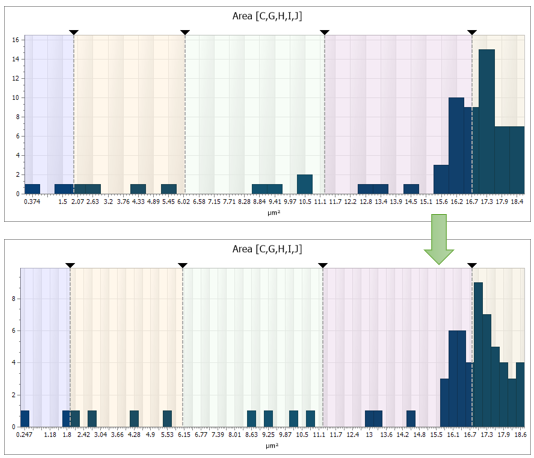
 Tip - Excluding the huge "background" particle
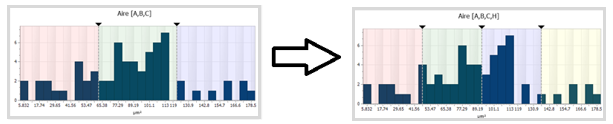
If you have one enormous particle (often the background), the histogram becomes unreadable, as all relevant values are concentrated in one class.
Solution 1: Deleting the respective huge particle in the study
1.Close the Manage classifications dialog.
2.In the study, delete the respective huge particle. More information...
3.Re-open the Manage classifications dialog.
The heights of the small particles are now more evenly distributed, and visible in the histogram:
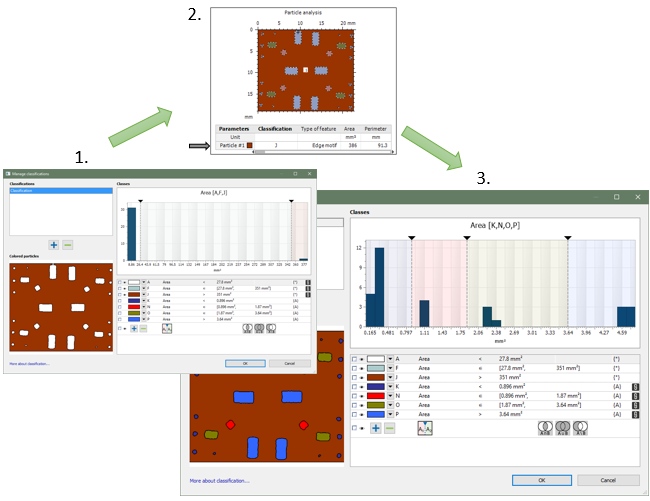
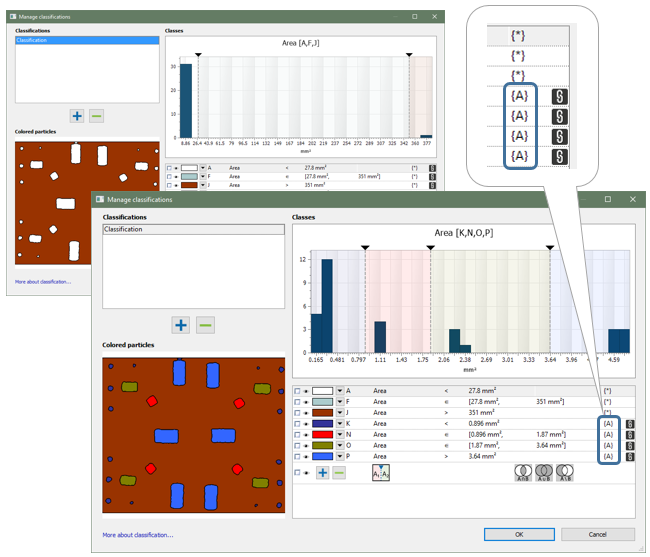
Solution 2: Using only a subset of particles, in another class
Note: You must create 2 independent groups of classes, that are not linked (for example 2 classes "Area" without a link symbol).
Example:
To get rid of the huge background particle (in classes K, N, O, P):
▪Use a subset of particles (the results of class {A}, i.e. only small particles), for the group of classes K, N, O, P:
See also...
▪"Particle analysis in Mountains 8": www.digitalsurf.com/news/particle-analysis-in-mountains-8/